
Introduction
Creating an outdoor oasis at home is more than just a trend; it’s a way to cultivate a personal retreat, a sanctuary where you can unwind, entertain, or connect with nature. Your outdoor space can significantly enhance the overall aesthetics of your home, acting as an extension of your living area. Among the many elements that contribute to this transformation, stair designs hold a unique power to elevate these spaces. They serve not only as functional pathways but also as artistic statements that can harmonize or contrast with your natural surroundings.
DIY projects, particularly when it comes to outdoor stairs, offer an incredible opportunity for homeowners to infuse their personal style into their environments. Not only are these projects often more cost-effective than hiring a contractor, but they also allow for a level of customization that reflects your individual taste and needs. Imagine designing a stairway that not only connects different levels of your garden but also complements the overall theme you’ve envisioned. How can a simple stair design transform your outdoor oasis? Let’s delve into this creative journey together.
“Creating a cozy reading nook is all about maximizing comfort in a small space. It’s about intentional design that serves both function and feeling.”
– Interior Design Magazine
Understanding the Basics of Outdoor Stair Design
When embarking on a DIY stair project, understanding the basics of outdoor stair design is crucial. First and foremost, functionality and safety must be prioritized. Stairs should provide a secure means of access between different levels of your outdoor space while adhering to local building codes. This includes considerations such as tread depth and riser height, which need to be comfortable for users and prevent accidents.
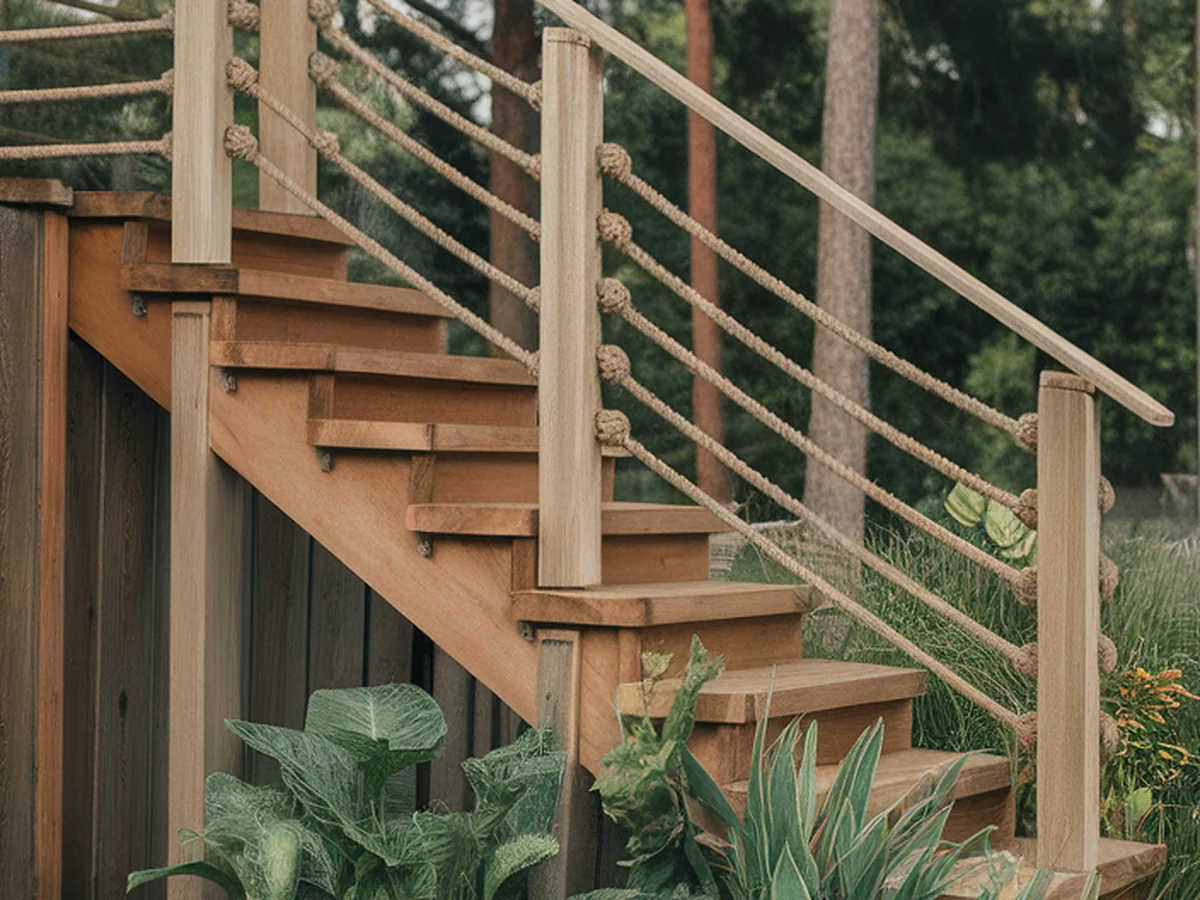
Selecting the right materials is also vital. Common options for outdoor stairs include wood, stone, and metal. Each material has its own aesthetic and functional characteristics. For example, wood offers a warm, natural look and can be easily customized, while stone provides durability and a rugged, timeless appeal. Metal, on the other hand, is sleek and modern, often requiring less maintenance than its wooden counterparts.
You must also consider climate and weather conditions when choosing materials. In areas prone to heavy rainfall or snow, materials should be resistant to moisture and decay. For instance, pressure-treated wood or composite materials can withstand harsh weather better than untreated wood.
Basic design principles such as proportions, balance, and harmony are essential for creating visually appealing stairs. Ensuring that the stairs complement the surrounding landscape and architecture will enhance your outdoor oasis rather than detract from it.
Choosing the Right Location for Your Stairs
The placement of your stairs is just as important as their design. Strategic positioning can maximize both visual appeal and functionality. Stairs can serve as a focal point, drawing the eye and guiding visitors through your outdoor space. Consider placing them in areas where they can connect different levels or sections of your garden, such as from a patio to a flower bed or from a deck to a lower yard.
Accessibility is another crucial factor. You should ensure that your stairs can be used comfortably by everyone, including individuals with mobility challenges. This may involve creating wider treads, adding handrails, or opting for a gradual incline rather than steep steps.
Incorporating natural pathways into your design can enhance the overall flow of your outdoor space. Paths made from gravel, stones, or mulch can lead to your stairs, creating a seamless transition between different areas. Additionally, consider the landscaping surrounding your stairs—using plants, shrubs, or decorative elements can enhance their appearance and integrate them beautifully into your oasis.
Inspiring DIY Stair Design Ideas
As you begin to envision your DIY stair project, the possibilities for design styles are nearly limitless. Here are a few inspiring ideas that can help you get started:
– Rustic Charm: Wooden stairs with a weathered finish can evoke a rustic feel. Consider using reclaimed wood for an eco-friendly touch. Pair them with natural stone or gravel pathways for a cohesive look.
– Contemporary Flair: For a modern aesthetic, think about sleek metal stairs with clean lines. You can contrast this with lush greenery or colorful planters to soften the look.
– Nature-Inspired: Integrate nature by using large stone slabs as steps or creating stairs that mimic the shape of a natural hillside. This makes your stairs appear as though they are a part of the landscape itself.
– Functional Beauty: Incorporate built-in planters alongside or within the stairs. This not only adds greenery but also serves as a unique design element that sets your stairs apart.
– Lighting Elements: Install LED lights along the stair risers or under the handrails. This not only enhances safety during nighttime use but also creates a magical atmosphere for evening gatherings.
By combining these elements, you can create stairs that are not only functional but also a true reflection of your personal style.
Step-by-Step Guide to Building Your Own Stairs
Embarking on a DIY stair project can be incredibly rewarding. Below is a step-by-step guide to help you through the process:
1. Gather Materials and Tools:
– Materials: Pressure-treated lumber or composite boards, concrete blocks (if needed), screws, gravel or sand for leveling, and paint or sealant for finishing.
– Tools: Circular saw, level, measuring tape, drill, shovel, and safety gear.
2. Design Your Stairs: Sketch out your stairs, noting the dimensions and layout. Ensure that you follow basic design principles for safety and aesthetics.
3. Prepare the Site: Clear the area where the stairs will be built. Use a shovel to level the ground and create a stable base.
4. Construct the Framework: Start with the bottom frame, ensuring it’s level. Attach the stringers (the sloped boards that support the treads) securely to the frame.
5. Add Treads and Risers: Install the treads (horizontal parts) and risers (vertical parts) to the stringers. Ensure they are evenly spaced and secure.
6. Install Handrails: If required, add handrails for safety. Make sure they are at the appropriate height and securely fastened.
7. Finishing Touches: Sand any rough edges and apply a weather-resistant finish. This will protect the wood and enhance its appearance.
8. Safety Precautions: Always wear safety gear, including gloves and goggles, when using power tools. Ensure that your work area is clear of hazards.
9. Durability Tips: Use high-quality materials and proper construction techniques to ensure your stairs withstand the elements. Regularly check for wear and tear and perform maintenance as necessary.
By following these steps, you’ll be on your way to creating a stunning stairway that complements your outdoor oasis.
Incorporating Landscaping and Décor
Once your stairs are built, the next step is to enhance their surroundings through thoughtful landscaping and décor. Blending your stairs seamlessly with the landscape can elevate the overall aesthetics of your outdoor oasis. Here are some ideas to consider:
– Natural Integration: Use native plants and flowers to line the stairs, creating a vibrant and inviting pathway. Consider incorporating ground cover plants that will spill over the edges, softening the look of the stairs.
– Decorative Elements: Add decorative stones or pebbles around the base of the stairs to create a cohesive look with the surrounding landscape. Use colorful tiles or mosaics as accents on the risers for added interest.
– Lighting: Illuminate your stairs with fairy lights or lanterns. Pathway lights can guide the way during the evening and create a warm ambiance for gatherings.
– Seasonal Updates: Regularly update your landscaping to reflect the changing seasons. Incorporate seasonal flowers or decorations that can enhance the charm of your outdoor stairway throughout the year.
– Maintenance: Keep the area around your stairs tidy by regularly trimming plants and removing debris. This will ensure that your stairs remain a focal point of your outdoor space.
By thoughtfully incorporating landscaping and décor, you can create a harmonious environment that draws attention to your DIY stair creation.
Safety Features and Maintenance Tips
Safety should always be a top priority in stair design and construction. Here are some essential features to incorporate into your stairs:
– Non-Slip Surfaces: Consider using textured materials or applying non-slip coatings to treads to enhance traction, particularly in wet conditions.
– Proper Railing Height: Ensure that handrails are at an appropriate height (typically between 34-38 inches) and are securely anchored. This is especially important for families with children or elderly individuals.
– Regular Maintenance: Different materials require different maintenance approaches. For wooden stairs, regularly check for rot or splinters and reapply protective finishes as needed. Metal stairs may need rust prevention treatments, while stone should be cleaned to prevent moss or algae growth.
– Common Issues: Be vigilant for signs of wear, such as loose treads or unstable railings. Addressing these issues promptly can prevent further damage and ensure longevity.
– Inspection Routine: Regularly inspect your stairs, especially after harsh weather conditions. This will help catch potential problems early, allowing you to keep your outdoor oasis safe and beautiful.
By implementing these safety features and maintenance tips, you will not only enhance the longevity of your DIY stair project but also ensure that it remains a safe and inviting part of your outdoor oasis.
Showcasing Your DIY Stair Creations
Once you’ve completed your stair project, it’s time to share your accomplishments! Documenting your DIY journey can be both rewarding and inspiring for others. Here are some ideas on how to showcase your work:
– Social Media: Platforms like Instagram and Pinterest are perfect for sharing photos of your completed stairs. Use relevant hashtags to reach a wider audience and connect with fellow DIY enthusiasts.
– Blogging: Consider starting a blog to chronicle your DIY projects. This can serve as a personal diary of your home improvement journey while providing tips and insights for others.
– Community Sharing: Organize outdoor gatherings to showcase your newly created oasis. Invite friends and neighbors to enjoy your space, fostering a sense of community and appreciation for hard work.
– Portfolio Creation: Over time, you may want to create a portfolio of your DIY projects. This can be beneficial if you plan to take on more ambitious projects or even pursue a career in landscaping or home improvement.
By sharing your DIY stair creations, you not only celebrate your hard work but also inspire others to embark on their own creative journeys.
Conclusion
The transformative power of DIY stair designs can turn an ordinary outdoor space into an extraordinary oasis. From enhancing functionality and safety to adding a personal touch, your stairs can be a statement piece that ties your outdoor environment together. As you envision your own outdoor oasis, remember that the journey begins with just one step—literally!
We encourage you to take that first step towards creating your dream outdoor space. Whether you’re inspired by the ideas shared in this article or have your own vision, the possibilities are endless. Share your experiences, ask questions, and don’t hesitate to explore the creative process. Start your journey to create a breathtaking outdoor oasis today!
| Element | Small Space Solution | Benefits |
|---|---|---|
| Furniture | Multi-functional pieces | Saves space |
| Storage | Vertical solutions | Maximizes wall space |
| Decor | Minimalist approach | Reduces visual clutter |
Frequently Asked Questions
What materials are best for outdoor stairs?
The best materials for outdoor stairs depend on your aesthetic preferences and local climate. Commonly used materials include pressure-treated wood, composite boards, stone, and metal. Each has its own benefits; for instance, wood offers a natural look, while stone is durable and weather-resistant. It’s essential to choose materials that can withstand your specific weather conditions to ensure longevity.
How do I ensure my outdoor stairs are safe?
To ensure safety, focus on several key features: use non-slip surfaces, maintain proper tread and riser dimensions, and install handrails at a suitable height. Regularly inspect your stairs for wear and tear, and address any issues promptly. Following these guidelines will help create a safe environment for your outdoor space.
Can I integrate lighting into my outdoor stair design?
Absolutely! Integrating lighting into your outdoor stair design enhances both safety and aesthetics. You can use recessed lighting along the edges of the treads, pathway lights to illuminate the stairs, or string lights for a whimsical touch. Lighting not only provides visibility at night but also adds a magical ambiance to your outdoor gatherings.
How often should I maintain my outdoor stairs?
Maintenance frequency varies based on the materials used and local weather conditions. For wooden stairs, inspect quarterly for rot or splinters and reapply protective finishes annually. Metal stairs should be checked for rust and treated as needed, while stone requires cleaning to prevent moss buildup. Regular inspections will prolong the life and beauty of your stairs.
What are some creative design ideas for my DIY stairs?
Creative design ideas for your DIY stairs can include using natural materials like stone or reclaimed wood, incorporating built-in planters for greenery, or adding decorative tiles on risers for visual interest. You can also consider unique shapes, such as curved stairs or tiered designs, to create a stunning focal point in your outdoor oasis.