
Introduction
French nail art has long been celebrated for its chic simplicity and elegant appeal. This classic style typically features a nude or light pink base with white tips, making it a go-to choice for those seeking a polished look. However, as seasons change, so too can your nail art. Seasonal themes allow you to express your creativity through colors and designs that reflect the beauty around you. Spring, with its vibrant blooms and soft pastels, presents a perfect opportunity to refresh your nails and dive into DIY nail art. This article will guide you through creating stunning Spring-inspired French nail designs, empowering you to unleash your creativity and make your nails a canvas for personal expression.
“Creating a cozy reading nook is all about maximizing comfort in a small space. It’s about intentional design that serves both function and feeling.”
– Interior Design Magazine
Understanding the Essentials of French Nail Art
Traditional French nail art is characterized by its understated elegance, which typically involves a natural, sheer base color complemented by white tips. This timeless design is versatile and can be adapted in numerous ways, making it ideal for seasonal variations. To embark on your DIY nail art journey, you will need a few essential tools and materials, including high-quality nail polish, nail brushes, a base coat, and a top coat.
Before you begin painting, it’s crucial to take care of your nails. Ensure they are clean, trimmed, and moisturized. A well-maintained nail bed not only enhances the look of your art but also promotes healthy nails. For Spring, opt for color palettes that evoke the season’s freshness—think soft pastels like lavender, mint green, baby blue, and pale yellow. These colors resonate with the essence of Spring and can beautifully complement the classic French design.
Gathering Your Spring-Inspired Supplies
To create stunning Spring nail art, you’ll need to gather some essential supplies. Here’s a handy list to get you started:
| Supply | Purpose | Recommended Brands |
|---|---|---|
| Nail Polish | Base and design colors | O.P.I, Essie, Sally Hansen |
| Nail Brushes | For detailed designs | Beauty Secrets, Born Pretty |
| Top Coat | For shine and longevity | Seche Vite, Essie Good to Go |
When selecting your colors, consider choosing shades that represent the joyfulness of Spring. Pastels are always a safe bet, but you can also experiment with bolder colors like coral or teal for a modern twist. Additionally, consider embellishments like floral stickers, gems, or glitter to elevate your designs and make them pop.
Basic Techniques for French Nail Art
Creating a classic French manicure is simpler than it may seem. Follow this step-by-step guide to achieve that perfect look:
1. Prep Your Nails: Start by removing any old polish and shaping your nails. Push back cuticles and buff the surface lightly to create an even canvas.
2. Apply a Base Coat: This is essential for protecting your nails and ensuring your polish adheres well. Allow it to dry completely.
3. Base Color Application: Choose a nude or light pink polish and apply it evenly across your nails. Depending on the opacity, you may need two coats. Let it dry thoroughly.
4. Creating Tips: Using a thin nail brush or nail tape, carefully apply white polish to the tips of your nails. A steady hand will help achieve a clean line. If you’re feeling adventurous, consider using pastel colors for the tips instead of traditional white.
5. Top Coat: Finish with a high-quality top coat to add shine and ensure longevity. This step is crucial for a professional-looking finish.
For best results, practice your technique a few times before moving onto more intricate designs.
Exploring Spring Themes and Designs
Spring is a season bursting with inspiration, and your nails can reflect that vibrancy through various themes and designs. Here are some ideas to explore:
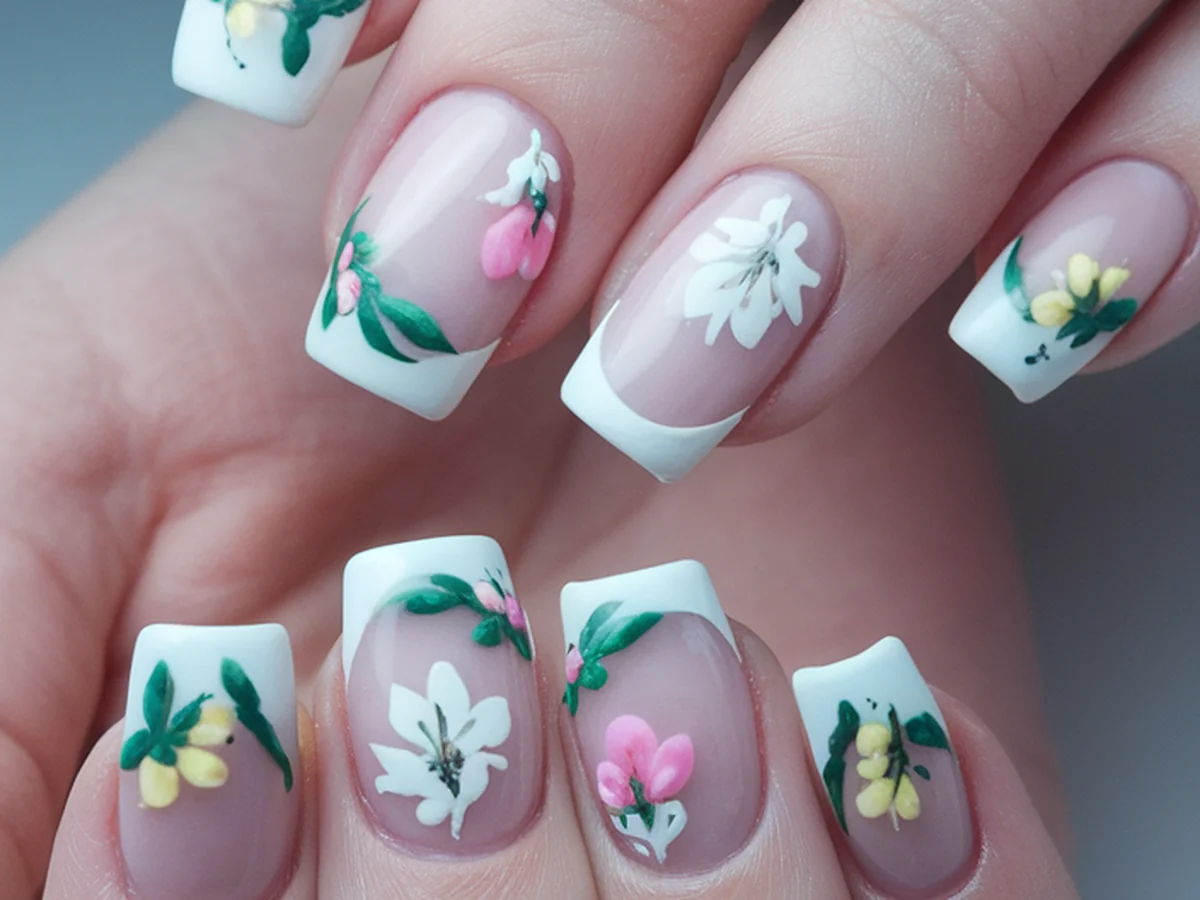
– Floral Designs: Incorporating flowers into your nail art is a quintessential Spring theme. You can use small dotting tools to create delicate flowers on your French tips or use nail stickers for an easy application.
– Pastel Colors: Soft colors like lilac, mint, and baby pink are perfect for this season. Create a pastel gradient effect on your French tips for a fresh and modern look.
– Geometric Shapes: For a contemporary twist, consider adding geometric patterns alongside your French tips. Simple triangles or stripes in contrasting Spring colors can give your nails a trendy edge.
– Seasonal Symbols: Enhance your French manicure with seasonal motifs like butterflies, raindrops, or even tiny birds. These details can bring your Spring nail art to life.
Each design can be personalized to reflect your style, allowing you to experiment and refine your techniques.
Creative Techniques to Enhance Your Nail Art
Once you’ve mastered the basics, it’s time to explore more creative techniques to elevate your nail art:
– Ombre Effect: This trendy technique creates a beautiful gradient that blends two or more colors seamlessly. Start with a base coat, then use a makeup sponge to dab on your chosen colors, blending them where they meet.
– Stamping Techniques: Nail stamping allows for intricate designs without the need for advanced painting skills. Use nail plates and a stamping tool to transfer designs onto your nails effortlessly.
– Water Marbling: This fun technique involves creating patterns by swirling different colors of polish in a bowl of water. Dip your nail in the water to pick up the design, resulting in unique, one-of-a-kind art.
– Nail Art Brushes: Invest in a set of fine detail brushes to achieve more intricate designs. Different brush shapes can help you create various effects, from delicate lines to bold strokes.
These techniques can add depth and creativity to your nail designs, making them truly stand out this Spring.
Step-by-Step Tutorials for Spring-Inspired French Nail Art Designs
Let’s dive into some fun and creative tutorials that will guide you in creating stunning Spring-inspired French nail art designs:
Tutorial 1: Floral French Tips
1. Begin with a nude base coat and let it dry.
2. Using a thin brush, paint white tips as usual.
3. Once dry, use a dotting tool to create small flowers using pastel polish shades.
4. Finish with a top coat to seal your design.
Tutorial 2: Pastel Ombre French Nails
1. Apply a base coat of sheer pink polish.
2. Choose two or three pastel colors for the ombre effect.
3. Use a makeup sponge to dab colors onto the tips, blending them as you go.
4. Seal with a top coat.
Tutorial 3: Geometric Spring Patterns
1. Start with a clear base coat.
2. Paint your French tips in a pastel color.
3. Once dry, use striping tape to create geometric patterns and fill them with contrasting colors.
4. Finish with a top coat for a sleek look.
Tutorial 4: Butterfly Accents on French Nails
1. Apply a nude base followed by white tips.
2. Use a fine brush to paint tiny butterflies on a couple of accent nails.
3. Add dots or small flowers around the butterflies for extra flair.
4. Seal everything with a top coat.
With these tutorials, you can easily create beautiful Spring-inspired nail art that reflects the season’s joy and vibrancy.
Nail Art Maintenance and Tips for Longevity
After putting in the effort to create stunning nail art, you want to ensure it lasts. Here are some tips for maintaining your manicure:
– Nail Care: Keep your nails moisturized with cuticle oil and hand cream. This not only looks good but also helps prevent breakage.
– Avoid Harsh Chemicals: When cleaning or doing chores, wear gloves to protect your nails from harsh chemicals and prolonged water exposure.
– Regular Touch-Ups: If you notice chips or wear, don’t hesitate to do small touch-ups rather than starting over. This will extend the life of your manicure.
– Recommended Products: Invest in quality top coats and nail strengtheners. Products like Seche Vite and Essie’s Good to Go are excellent choices.
– Fixing Mistakes: If you make a mistake, use a small brush dipped in polish remover to clean up edges. This will help maintain a polished look.
With proper care, your Spring-inspired nail art can last for weeks, keeping your nails looking fabulous.
Sharing Your Creations and Inspiring Others
Once you’ve created your beautiful Spring nail designs, why not share them with the world? Social media platforms like Instagram and Pinterest are fantastic for showcasing your art. Here are some tips to get you started:
– Photography Tips: Good lighting is key. Natural light works best, so try taking photos near windows during the day. Use simple backgrounds to let your nails shine.
– Engage with the Community: Join online nail art communities or forums to share your tips, tricks, and designs. Engaging with others can lead to inspiration and new ideas.
– Use Hashtags: When posting your nail art, include relevant hashtags like #NailArt, #SpringNails, or #FrenchManicure to reach a wider audience.
– Seek Inspiration: Follow other nail artists and explore their designs. This can help spark your creativity and encourage you to try new techniques.
Sharing your work not only adds to the nail art community but can also inspire others to unleash their creativity.
Conclusion
The joy of DIY nail art lies in the opportunity to express yourself creatively, and Spring offers a vibrant palette of inspiration to work with. From floral patterns to pastel colors, the possibilities are endless. Embrace the season by experimenting with your designs and personalizing each look to reflect your unique style. As you embark on this creative journey, remember that practice makes perfect. Don’t hesitate to share your experiences and inspire others in the nail art community. So grab your tools, unleash your creativity, and let your nails blossom this Spring!
Frequently Asked Questions
What are the best colors for Spring nail art?
Spring nail art often features soft pastel colors like lavender, mint green, baby pink, and light yellow. These colors reflect the season’s freshness and vibrancy. However, you can also incorporate bolder hues like coral or teal to add a modern twist to your designs. Experimenting with color combinations can yield beautiful, eye-catching results.
How do I prevent nail polish from chipping?
To prevent chipping, it’s essential to apply a quality base coat before your polish and finish with a durable top coat. Additionally, avoid using your nails as tools, and be cautious when engaging in activities that may damage your manicure. Regularly moisturizing your nails and cuticles can also help maintain their integrity.
Can I do nail art on natural nails?
Absolutely! Natural nails are perfect for nail art and can showcase intricate designs beautifully. Just ensure that your nails are well-prepped, clean, and in good condition before applying polish. If you prefer a longer-lasting look, consider using a gel polish, which can provide added durability.
How do I fix nail art mistakes?
If you encounter any mistakes while doing your nail art, don’t panic! Use a small brush dipped in nail polish remover to clean up edges or correct any errors. This will help maintain a polished finish. For larger mistakes, you may need to start over on that particular nail, but touch-ups can often save the day.
Where can I find more nail art inspiration?
There are numerous resources for finding nail art inspiration. Social media platforms like Instagram and Pinterest are treasure troves of creative ideas. Additionally, nail art blogs and YouTube channels often provide tutorials and tips. Participating in online nail art communities can also connect you with other enthusiasts and share ideas.